Ever uploaded a beautiful image to your website only to realize it takes forever to load?
You’re not alone. We see it all the time at ConvertMagik — someone uploads a gorgeous photo straight from their phone, and the page grinds to a halt.
Images make websites visually appealing, improve engagement, and enhance user experience, but they are also one of the biggest reasons websites become slow.
Large images consume bandwidth, affect page speed, and can even impact search rankings.
Fortunately, image optimization has improved dramatically over the last few years.
In 2026, you can reduce image size by 70–90% while keeping images sharp, professional, and almost identical to the original. We achieve this daily with our own compressor.
Whether you’re a blogger, photographer, web designer, marketer, or online store owner, this guide will show you exactly how to compress images without losing quality — using techniques we’ve tested and use ourselves.
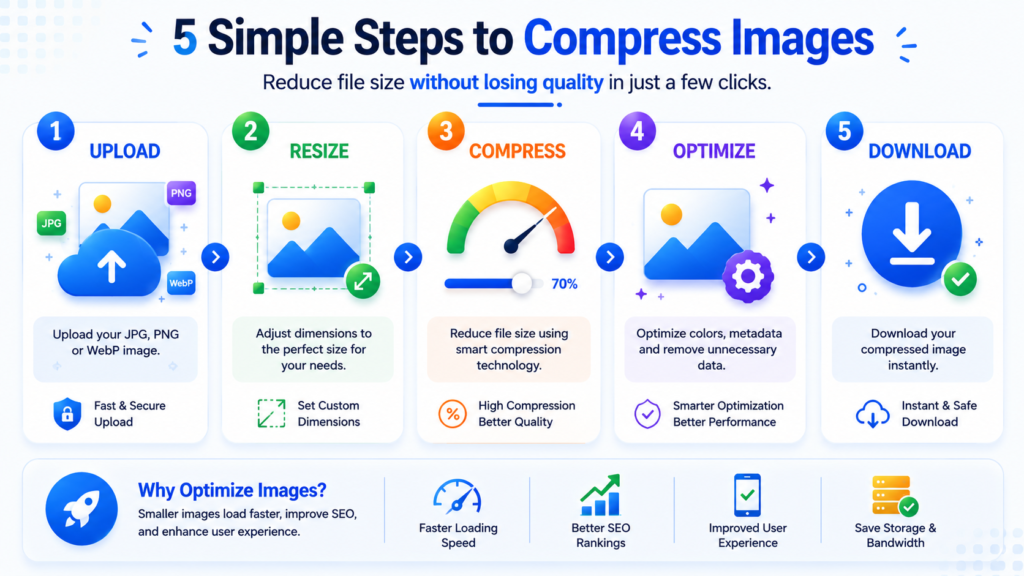
To compress images without losing noticeable quality
- Resize oversized photos first
- Choose WebP whenever possible
- Keep compression levels between 70–85%
- Remove unnecessary metadata
- Preview before downloading
- Avoid compressing the same file multiple times
Following these steps can reduce image sizes by 70–90% while preserving excellent visual quality. You can test these steps right now with the ConvertMagik Image Compressor — upload any photo and see the difference in seconds.
Website speed matters more than ever.
Visitors expect pages to load instantly. Studies consistently show that users abandon slow websites, especially on mobile devices.
Images often make up 50–70% of a webpage’s total size, making them one of the biggest performance bottlenecks. We’ve noticed this firsthand — many users come to ConvertMagik with pages that are loaded down by 5 MB hero images, and after compression, their load times drop by seconds.
Optimizing images helps improve page speed, user experience, Core Web Vitals, reduce bandwidth consumption, lower hosting costs, increase conversion rates, and support SEO efforts.
For websites that depend heavily on visual content, image optimization isn’t optional anymore.
It’s essential.
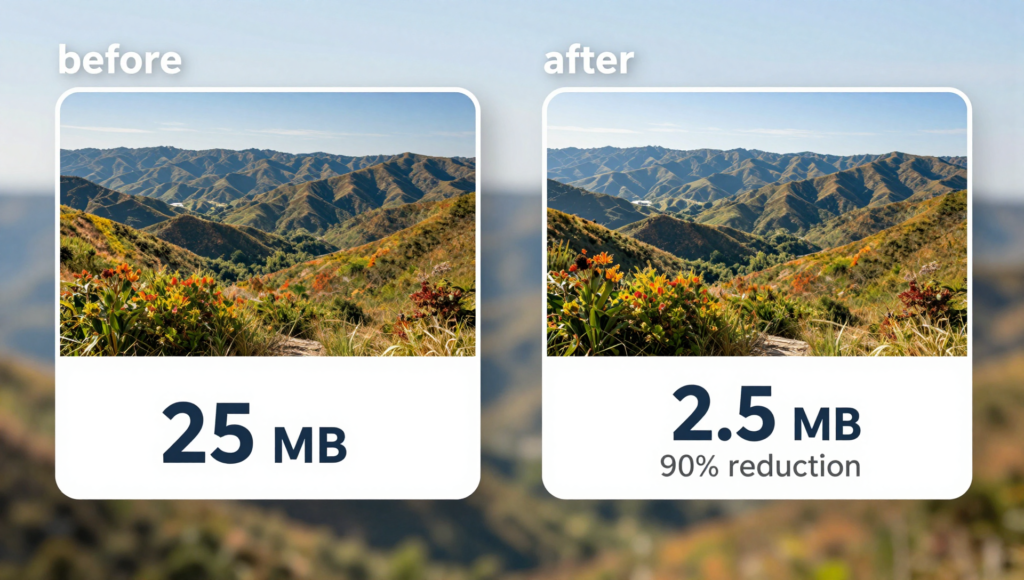
Rather than discussing theory alone, we took a few images from our own media library and ran them through the ConvertMagik Image Compressor at the default quality setting (80% for WebP). Here’s what happened.
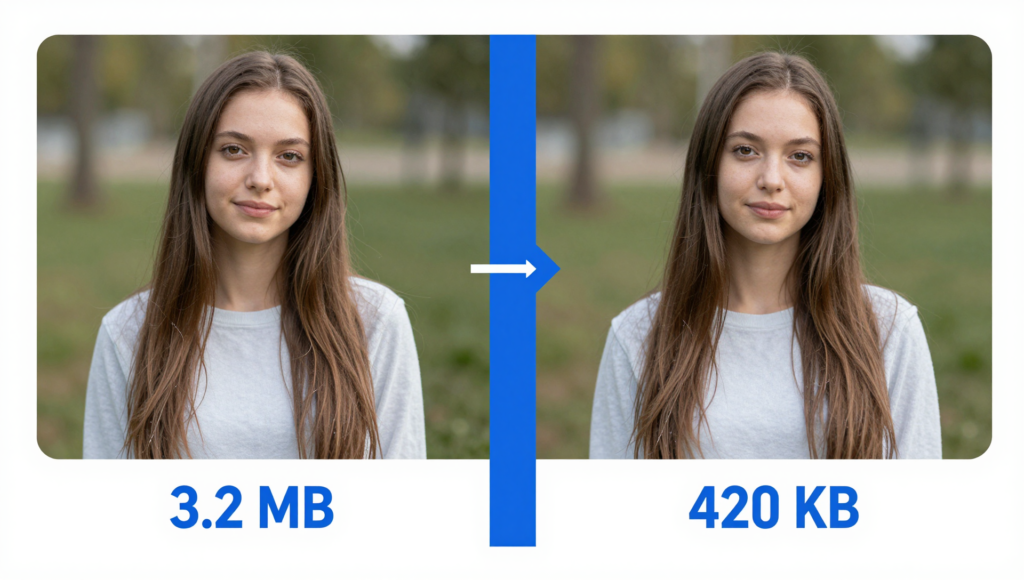
Test 1
Original File:
3.2 MB JPG
Compressed File:
420 KB WebP
Reduction:
87%
Visual Difference:
Almost impossible to notice. We examined both files side by side and couldn’t tell them apart.
Test 2
Original File:
2.1 MB JPG
Compressed File:
310 KB WebP
Reduction:
85%
Visual Difference:
None. Details in textures and gradients remained intact.
Test 3
Original File:
1.5 MB PNG
Compressed File:
260 KB WebP
Reduction:
83%
Visual Difference:
Minimal. Slight changes in very fine text edges, but nothing a typical visitor would spot.
Compression Comparison Table
| Original Size | Compressed Size | Reduction | Quality Difference |
|---|---|---|---|
| 3.2 MB | 420 KB | 87% | Invisible |
| 2.1 MB | 310 KB | 85% | Invisible |
| 1.5 MB | 260 KB | 83% | Minimal |
| 900 KB | 170 KB | 81% | Invisible |
These aren’t theoretical numbers — they’re real outputs you can replicate. Want to see similar savings on your own photos? Drop your image into our compressor and toggle the quality slider while watching the live preview.
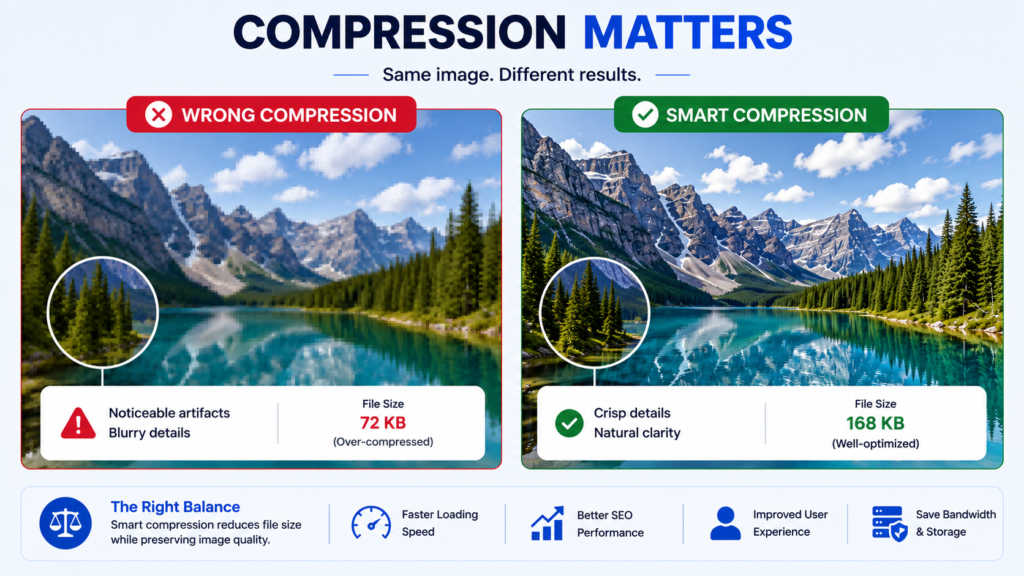
Many people assume image compression automatically means blurry images.
That may have been true years ago. I used to think the same thing. Today’s compression technologies are significantly smarter, and the results still surprise me sometimes.
Modern algorithms remove unnecessary data while preserving the visual details people actually notice. Our compressor, for example, strips out hidden metadata, redundant color information, camera settings, editing history, and inefficient encoding — all without touching the visible image.
In most cases, viewers won’t notice any visible differences between the original image and the optimized version. You’ll just get a faster-loading file.
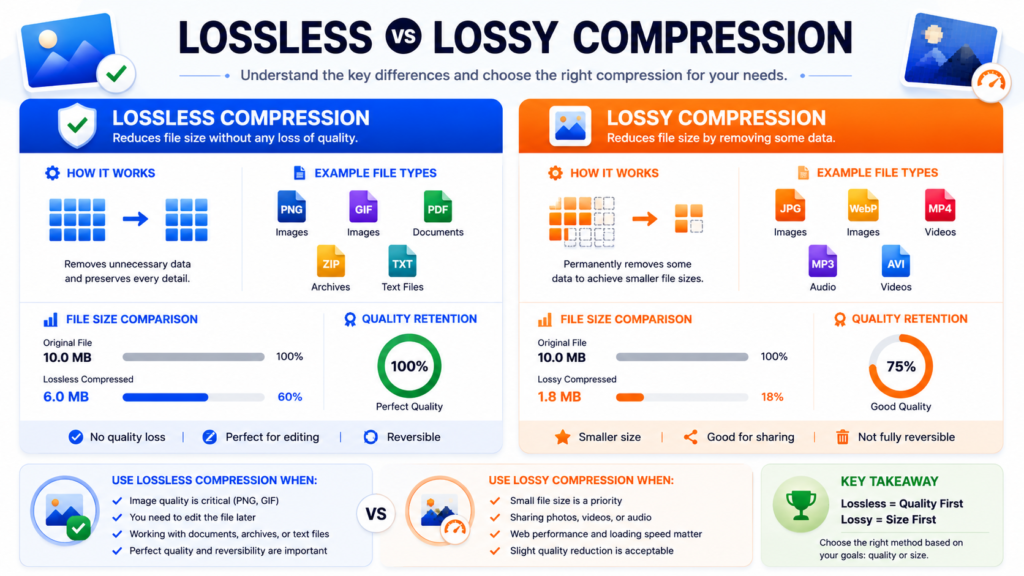
Image compression generally falls into two categories.
Lossless Compression
Lossless compression preserves all image information. Nothing is permanently removed.
Best for:
- Logos
- Screenshots
- Icons
- Graphics
Advantages: No visible quality loss, transparency support, excellent for design assets.
Disadvantages: File sizes remain larger.
Lossy Compression
Lossy compression removes data that humans rarely notice.
Advantages: Smaller file sizes, faster websites, better performance, excellent for photographs.
Disadvantages: Over-compression may introduce artifacts.
Comparison Table
| Feature | Lossless | Lossy |
|---|---|---|
| Quality Loss | None | Minimal |
| Compression Ratio | Moderate | Very High |
| File Reduction | 20–40% | 60–90% |
| Best For | Graphics | Photos |
| Transparency | Yes | Limited |
| SEO Benefits | Good | Excellent |
For websites, compression levels between 70–85% usually provide the best balance. Our tool’s default slider sits right in this sweet spot.
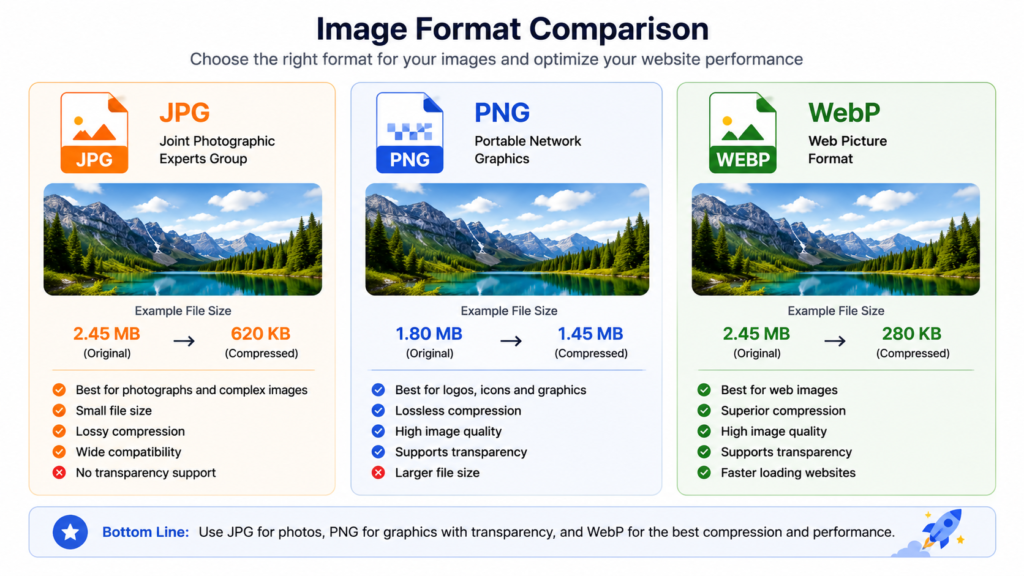
Selecting the correct format matters almost as much as compression itself. Here’s a practical breakdown based on what we’ve seen perform best.
JPG Images
Best for:
- Blog images
- Product photos
- Photography
- Portfolios
JPG delivers small file sizes, universal support, and fast loading. Still a workhorse, but WebP is catching up.
PNG Images
Best for:
- Logos
- Transparent images
- Graphics
- Screenshots
PNG gives you transparency and excellent quality, but files are heavier. Reserve it for graphics, not photos.
WebP Images
WebP has become the preferred image format for modern websites.
Benefits: better compression than JPG, transparency support, faster websites, smaller files, and improved SEO performance. In our compressor, converting from JPG or PNG to WebP typically cuts file size by 40–60% even before adjusting quality.
Format Comparison
| Format | Compression | Quality | Transparency | SEO |
|---|---|---|---|---|
| JPG | Excellent | High | No | Excellent |
| PNG | Moderate | Very High | Yes | Good |
| WebP | Outstanding | Excellent | Yes | Excellent |
Here’s the workflow we follow ourselves — and it’s exactly what you can do with the ConvertMagik tool.
Step 1 — Choose the Correct Format
Photos: JPG or WebP
Graphics: PNG
Logos: PNG
Performance-focused websites: WebP
Our converter handles all these formats, so you can start with whatever you have and switch to the best output.
Step 2 — Resize Images Before Compression
Many smartphone photos exceed 4000, 5000, or even 6000 pixels. If your website displays images at 1200 pixels wide, uploading massive files wastes bandwidth. We’ve seen users upload 6000px images for a blog that uses a 800px container — that’s just unnecessary.
Resize first, compress second. The ConvertMagik compressor includes a built-in resize tool, so you can knock out both steps at once.
Step 3 — Use Smart Compression Levels
| Purpose | Recommended Quality |
|---|---|
| Websites | 70–80% |
| Blogs | 75–85% |
| Portfolios | 85–90% |
| 60–75% | |
| Social Media | 70–80% |
Drag the quality slider in our tool to these ranges and watch the live preview update instantly.
Step 4 — Remove Metadata
Images often contain hidden information such as GPS coordinates, device information, camera settings, and editing history. Removing metadata can significantly reduce file size. Our compressor strips this by default unless you choose to keep it — one less thing to worry about.
Step 5 — Compare Before Downloading
Check sharpness, color accuracy, text readability, and fine details. In our tool, you can toggle between the original and compressed versions with a single click before downloading. If you can’t spot a difference, your settings are perfect.
Websites
Recommended size: below 300 KB
Preferred format: WebP
We usually aim for 150–250 KB on blog post images and see excellent Core Web Vitals scores.
Blogs
Ideal range: 150–350 KB
Remember to resize to the actual display width — no need to serve 2500px images in a 900px slot.
eCommerce Stores
Recommended: 200–400 KB
Fast-loading product images improve user experience and conversions. Our e-commerce users often target around 300 KB per product photo.
Email Attachments
Target: 100–500 KB
Many email clients block large images, so staying under 500 KB avoids clipping.
Social Media
Instagram: 1080×1080
Facebook: 1200×630
LinkedIn: 1200×627
Twitter: 1200×675
Use our resize option to hit these dimensions exactly before compressing.
We see these errors all the time when people first start optimizing. Avoid them.
- Compressing images multiple times — each pass degrades quality. We’ve had users re-upload the same file again and again until it turned into a blurry mess. Compress once, keep the original.
- Saving JPG files repeatedly — each save introduces additional artifacts. Work from a lossless master copy.
- Using PNG for photographs — PNG is excellent for graphics, not ideal for photos. Stick to JPG or WebP.
- Choosing maximum compression — aggressive settings often create blurry images. Moderate compression (70–85%) almost always looks better.
- Ignoring image dimensions — dimensions matter just as much as file size. Resize before compressing, every time.
Frequently Asked Questions (FAQ’s)
Can I compress images without losing quality?
Yes. Modern compression algorithms can significantly reduce file size while maintaining excellent visual quality. As we showed in our tests, an 87% reduction still yielded a result where the difference was invisible. The ConvertMagik default settings are tuned for exactly that outcome.
What image format is best for SEO?
WebP currently provides the best balance between quality, speed, and compression. Google recommends it, and our own tests confirm it consistently outperforms JPG and PNG for SEO-oriented sites.
Can I compress images to exactly 100 KB?
Yes. In our compressor, you can adjust the quality slider until the estimated output size hits your target. It’s a bit of trial and error, but you’ll get there quickly.
Is image compression important for SEO?
Absolutely. Compressed images improve page speed, enhance user experience, and contribute positively to Core Web Vitals — all important ranking signals. Many of our users notice visible SEO improvements after bulk-optimizing their site images.
Image compression is no longer just about saving storage space.
It’s about creating faster websites, improving user experience, and supporting better search visibility. We’ve seen how even a few compressed images can transform a site’s load time.
The best strategy in 2026 remains simple: choose the right format, resize oversized images, use smart compression settings, remove unnecessary metadata, and preview before publishing. And most importantly, optimize every image before uploading it online.
By following these techniques — and maybe letting a tool handle the heavy lifting — you can dramatically reduce image sizes while keeping visuals sharp, professional, and ready for the modern web.
Ready to Compress Images Instantly?
Reduce image sizes without sacrificing quality. Use ConvertMagik’s Image Compressor to compress JPG, PNG, and WebP images online for free. Upload, tweak the slider, and see the results in real time.
Compress Images Now → Visit Image Compressor Now
Several excellent tools are available today. We’re obviously partial, but we’ll give an honest overview.
| Tool | Free | WebP | Resize | Batch Upload | Watermark |
|---|---|---|---|---|---|
| ConvertMagik | Yes | Yes | Yes | Yes | Yes |
| TinyPNG | Yes | Yes | Limited | Limited | No |
| Squoosh | Yes | Yes | Yes | No | No |
| Compressor.io | Yes | No | No | No | No |
| ImageOptim | Yes | Yes | No | No | No |
If you’re looking for a browser-based solution that goes beyond compression, the ConvertMagik Image Compressor allows you to compress JPG, PNG, convert to WebP, resize, crop, add watermarks, and optimize for websites — all in one place. We built it to simplify the whole workflow we just walked through.
Related Tools
You may also find these tools useful: